A rough terrain aficionado never leaves a clean road without having a winch included in their vehicles. Eventually, you will undoubtedly stall out and it’s anything but a matter of when not of if. Regardless of whether you are an accomplished driver, you might commit errors that may cause your vehicle to stall out. Winches are not restricted to self recovery when stuck, and they can likewise give your jeep more abilities. By abilities, I mean your vehicle has a lot of breathing space in investigating substantially more severe landscapes. You can use the winch to climb steep landscapes, and you only need to find an anchoring point to do that.
A winch can give you autonomy, there is no requirement for anybody’s help when stuck. Energizing right? What’s not to adore about it? We have a guide on our website on how to use a winch for self recovery here. But situations can be different, you might find yourself wanting to reverse when stuck. You are stuck and can’t proceed forward so going back is your only option, but how do you winch backward?
At a Glance
How To Winch Backwards
With our guide, we can teach you how to winch yourself backward. There are two ways to winching yourself backward, the first one is a simple way of winching yourself backward. The second way can get complicated and will need several snatch blocks.
Winching Directly
- Find A Stable Anchoring Point: Find a stable anchoring point that can withstand the weight of winching your car out.
- Disengage The Lever To Release Cable: The disengage lever is located outside of the winch. The lever should have labels that say “free spool” and “disengage”. Turn the lever to the option disengage, this allows you to manually pull out the winch cable.
- Pull Out The Winch Cable: Pull out the winch cable from the winch, but don’t pull too much that it causes unnecessary slack.
- Run The Cable Under Your Vehicle: Grab your winch cable and run it underneath the car. Make sure there are no places under your car that might cause the cable to get damaged.
- Turn The Lever to Engage: Your winch should also have a label “Engage”. Turn the lever to the label “Engage”, this prevents from anymore winch cable from coming out.
- Winch The Vehicle Towards The Anchoring Point: Using the remote, winch your way back towards the anchoring point. When this happens, the winch cable is slowly pulled towards the winch, causing the winch cable to tighten. Make sure to do the entire process methodically.
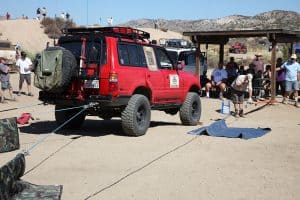
There are downsides to this winching method. Your car might get damaged since you operating a winch cable underneath the car which it is not designed for. This method also causes a lot of friction. An upside to this is that you don’t need snatch blocks and you only need one anchoring point.
Winching Using Snatch Blocks

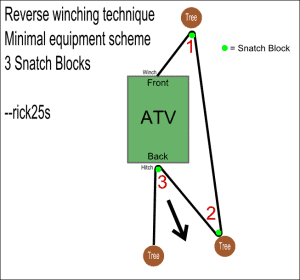
- Find Three Anchoring Points: Find three anchoring points that can withstand the weight of winching your car out. Look for trees that you can use in the same manner as in the illustration above.
- Disengage The Lever To Release Cable: The disengage lever is located outside of the winch. The lever should have labels that say “free spool” and “disengage”. Turn the lever to the option disengage, this allows you to manually pull out the winch cable.
- Pull Out The Winch Cable: Pull out the winch cable from the winch, but don’t pull too much that it causes unnecessary slack.
- Wrap A Tree Trunk Protector Around The Anchoring Points: A tree trunk protector is a nylon strap with a loop at each end. Make sure all three of your anchoring points have tree trunk protectors, they will be needed to hold the snatch blocks.
- Attach A D-Shackle: Attach a D-shackle to the three straps that you have placed.
- Hook Two Snatch Blocks To The D-Shackle: Next, simply attach two snatch blocks to the D-shackle that is attached to the tree trunk protector. Except for the last anchoring point.
- Hook A Snatch Block To The Rear Of Your Vehicle: Your third snatch block should be placed on the rear of your vehicle. Find a place where you can safely hook a snatch block to the rear of your vehicle.
- Wrap The Winch Cable Around The Snatch Blocks: The winch pulley block casing can be opened by turning the screw that is located on its side. Wrap the winch cable around the three pulleys then close the casing.
- Hook The Winch Cable Hook To The Third Anchoring Point: You have attached a D-shackle at the third point as stated in the previous step. Next, simply hook the winch cable to the D-shackle attached to the third anchoring point.
- Turn The Lever to Engage: Your winch should also have a label “Engage”. Turn the lever to the label “Engage”, this prevents from anymore winch cable from coming out.
- Start Winching: When you start winching your vehicle should now start driving backward.
This might seem confusing as to why the winch goes forwards instead of backward. Simply put, the winch is merely pulling the slack. As you can see in the illustration above, it might seem that there is no slack, but actually, there is slack. You can see the slack in the illustration between the two anchoring points that are parallel to each other.
As the winch pulls, the slack that is between the second and third points is being straightened out. In the illustration, you can see it as the triangle with the number 3 on it. Since the slack is being straightened te car being pulled by it also.
Conclusion
This is the two methods two winching yourself backward and this can help you if ever you get stuck. Do you have any more thought on this? Do you have a tip you can share? Comment below. Our website offers other tips and guides as well such as:


